🏡 How to Design a Residence Inside a Rectangular Building Unit — Step-by-Step with Free DWG Download
Designing a residence within a simple rectangular building footprint is one of the most common—and deceptively complex—challenges in architecture. While the geometry seems straightforward, the real test lies in balancing functionality, comfort, privacy, ventilation, and spatial flow.
In this post, we’ll guide you through the essential steps of creating a well-resolved residential plan in a rectangular unit, perfect for architecture students, interns, and self-learners. And yes—at the end of this post, you’ll be able to download a free reference DWG file to study, adapt, or improve your own ideas.
📐 Why Rectangular Units?
Rectangular plots are:
- Most commonly available in urban developments
- Cost-effective to construct (with fewer corners, easier structural planning)
- Easier to fit into modular grids, bylaws, and construction norms
But they also create challenges in natural lighting, airflow, and room hierarchy.
✅ Step 1: Understand the Site Constraints
Before designing, ask:
- What is the orientation of the plot? (north-south/east-west)
- What are the setbacks, building regulations, and height limits?
- Where will light, noise, and views come from?
- Are there any adjoining walls or common plot boundaries?
Even in a simple box, context drives form.
🛏️ Step 2: Define the Functional Zones
Break down the house into core zones:
|
Zone |
Includes |
|
Private |
Bedrooms, attached bathrooms |
|
Semi-private |
Living room, dining, guest bedroom |
|
Service |
Kitchen, store, utility, maid’s toilet |
|
Circulation |
Entry foyer, corridors, stairs, lobby |
|
Outdoor |
Garden, verandah, parking, rear service |
In a rectangular unit, try to divide the space in thirds or use an L or C pattern to cluster rooms meaningfully.
💨 Step 3: Think Ventilation + Lighting
Common mistake: lining all rooms along one edge of the box.
Instead:
- Use internal courtyards or light wells
- Stagger rooms slightly to allow corner windows
- Place toilets and stairs in the corners with least natural light
- Add vents and cutouts in slabs if it’s a two-storey house
Always prioritize cross-ventilation even if you’re building wall-to-wall.
🧭 Step 4: Orientation and Climate Response
Use local climate logic:
|
If you’re in a… |
Then… |
|
Hot-dry zone |
Use thick walls, central courtyard |
|
Warm-humid zone |
Openable facades, shaded verandahs |
|
Cold climate |
Maximize sun exposure on south-facing rooms |
|
Composite (like Ahmedabad) |
Combine courtyards with thermal mass |
Don’t just “fit rooms”—craft behavior.
🪟 Step 5: Design Room Hierarchy
A good rectangular plan feels open yet defined.
Start with:
- Living → Dining → Kitchen flow
- Bedrooms in quieter corners, ideally diagonally opposite the entrance
- Guest bed near entry (if needed)
- Compact stair placement that doesn’t eat into valuable daylight
Use partition walls, furniture layout, and even split-levels to shape perception in a rectangular volume.
🚪 Step 6: Place Doors and Windows Wisely
Don’t just follow symmetry—follow function:
- Avoid putting doors at corners—use the center of walls for better flow
- Bedrooms: at least 1 window + 1 ventilator
- Kitchen: cross-ventilation between hob and rear wall
- Living room: large window/door opening into semi-open space
Pro Tip: Flush doors to walls in smaller rooms to save usable space.
🧱 Step 7: Construction Practicality
If this is being designed for a real-world site, think:
- Use column grids of 3.0m to 4.5m for cost efficiency
- Avoid room widths greater than 5m unless you use beams/slabs carefully
- Use load-bearing options in low-cost builds
Structural sense = architectural success.
✍️ Step 8: Annotate and Detail Your Plan
Before submitting or using the design:
- Add north direction, scale, and labels to your drawing
- Include furniture layout to assess real usability
- Show wall thickness clearly
- Mark stair arrows, door swings, and level changes
If you’re a student, also include site plan and context diagram.
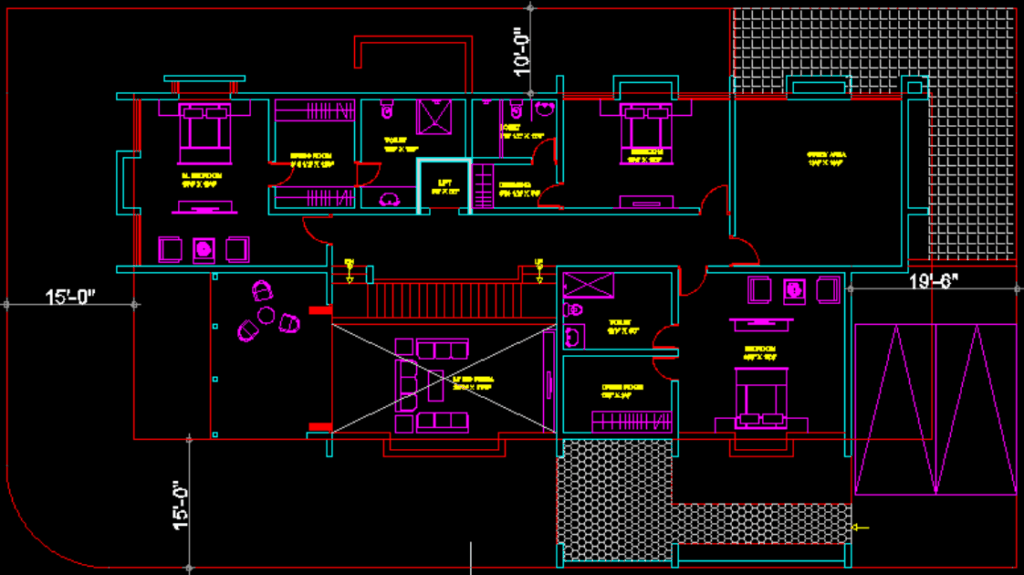
📂 Download Reference .DWG File
We’ve prepared a clean, well-layered, editable AutoCAD (.dwg) file of a complete residential design within a rectangular building unit.
This plan includes:
✅ Site plan with orientation
✅ Ground floor layout with zones
✅ Section and elevation references
✅ Furniture and toilet layout
✅ Stair and duct positioning
🆓 Click here to download the DWG file (Free)

(No registration required. For educational use only.)
Please read our Disclaimer before using the file.
A rectangular plot may seem simple, but it demands rigor in spatial sequencing, climate logic, and creative detailing. Use this tutorial as a starting framework, not a final answer. Every client, city, and user has their own needs—design with empathy and intention.